Schedule a session
Hyground can start a session for you at a planned time. You get a schedule in two ways. Ask the agent for it in a session, or fill in the Create schedule dialog yourself.
What does a schedule do?
Hyground starts a session at the planned time of a schedule. It sends the message you saved in that schedule to the agent.
Every session from a schedule is a scheduled session. It is shared with every user of your installation from the start. See Sessions Hyground starts.
Ask the agent for a schedule
You do not need the dialog. Describe the schedule you want in any session. Name the task and the time.
An example message:
Create a schedule that checks the cluster for failing pods every morning at 09:00.
Write your own task and your own time instead.
The agent does not create the schedule immediately. It repeats the frequency, the message, and the first run time. It then waits for your confirmation. In the example below it also offers to change the message or the time.
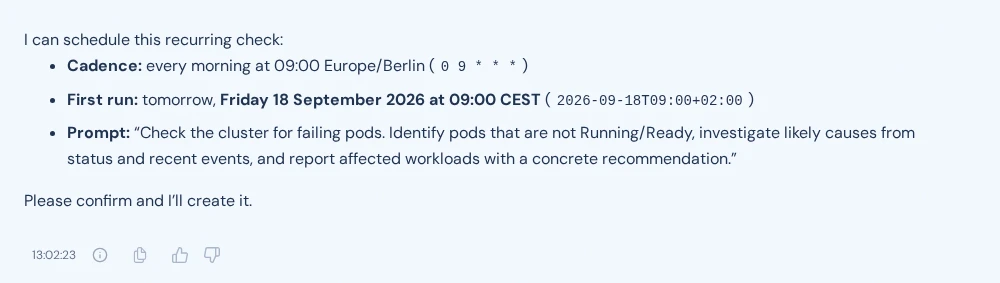
Read the repeated details, and correct what is wrong. Confirm the schedule in your next message.
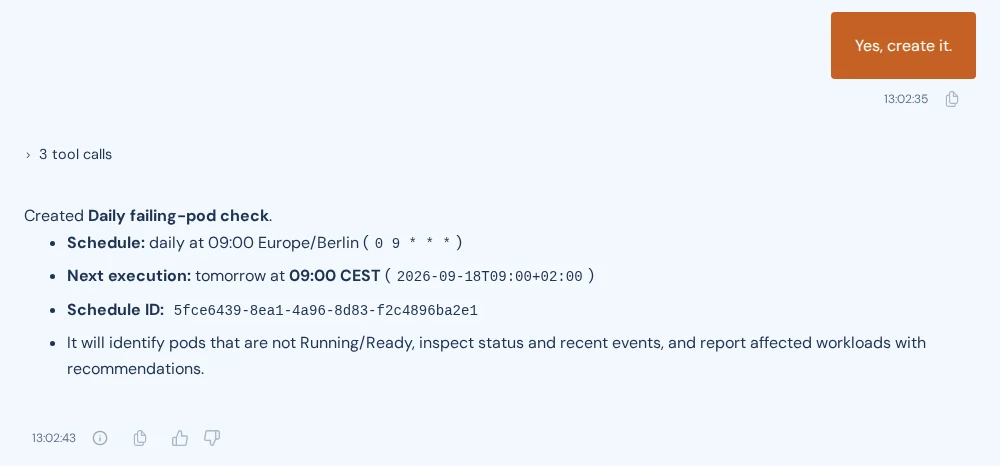
The reply of the agent can also show the time in a technical form. The Schedule column of the table shows the plain line, for example Every day at 09:00 (Europe/Berlin). See Where are the schedules? for that table.
Every user of your installation can read and change this schedule. Write nothing into the message that others must not read.
The agent can also change a schedule you name. It can rename it, rewrite the message, move the times, and pause it.
The agent cannot delete a schedule, and it cannot start one immediately. Use the row menu for both. It sits in the Actions column of the schedules table. See Delete a schedule and What else is in the row menu?.
Edit with Hyground in the row menu starts the same path for a schedule that exists.
Where are the schedules?
Click the Session Scheduler icon in the left navigation. The Schedules page opens.
The page lists the schedules of every user of your installation. Every user can open a schedule, change it, run it, and delete it. Write nothing into Prompt that other users must not read.
The page opens in the Calendar view. It shows one week. Click a free slot to open the Create schedule dialog for a One-time session at that time. Click an entry to open that schedule.
The Calendar view shows only the schedules that are on. A schedule that is off has no entry. Use the Table view to find it.
An entry in the week shows the name of the schedule. Hold the pointer over the entry. The tooltip reads the name, the time, and how often the schedule runs.
A One-time schedule does not repeat. Its tooltip reads the name and the time.
A schedule that runs more often than every 6 hours has no entry in the week. It appears in the Frequent row at the top, in every day column. That entry shows a repeat icon, the name, and a short cadence such as every 1h. Its tooltip reads the name and how often the schedule runs, without a time.
Click Table in the top right corner for the list of all schedules. Click Calendar to go back.
In which order does the table list the schedules?
Hyground sorts the table for you. It lists every schedule that is on before every schedule that is off. Inside a group the nearest Next execution stands first. The rows that show a dash follow, in alphabetical order by Name.
A One-time schedule turns itself off after it has run. It then stands with the schedules that are off.
Click Name, Next execution, or Enabled in the header row to sort by that column. Click the same header again to reverse the order. Click it a third time for the standard order again.
Next execution keeps the rows with a dash at the end in both directions. The other two columns do not.
Create a schedule in the dialog
-
Click the Session Scheduler icon in the left navigation.
-
Click New schedule in the Session Scheduler panel. The Create schedule dialog opens.
-
Type a name in Name.
-
Type your message in Prompt.
-
Click Recurring or One-time under Schedule type.
-
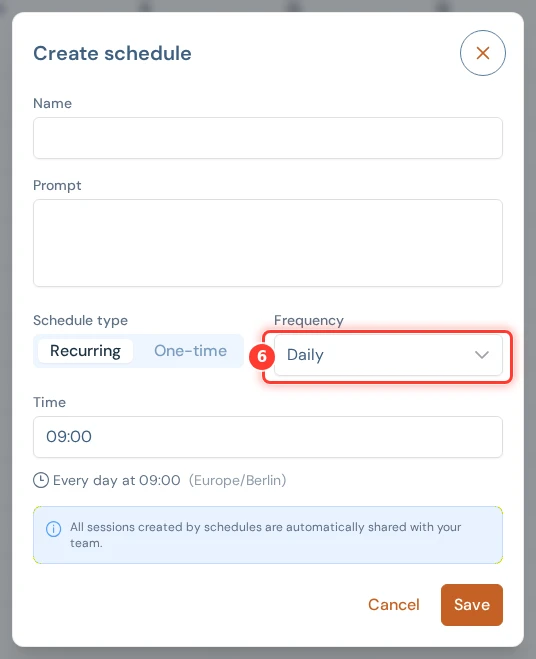
For Recurring, choose an entry in the Frequency list.
-
For Recurring, fill in the fields the frequency shows, for example Time.
-
For One-time, choose a date and a time in Run at.
-
Click Save.
Hyground shows Schedule created. Click Table in the top right corner to see the new schedule in the list.
You cannot change Schedule type later. Create a second schedule instead.
Which Frequency can you choose?
Frequency offers Every X minutes, Hourly, Every X hours, Daily, Weekly, and Monthly. Each choice shows its own fields:
- Every X minutes shows Run every. You choose 5, 10, 15, 20, or 30 minutes.
- Hourly shows At minute.
- Every X hours shows Run every and At minute. Run every offers 2, 3, 4, 6, 8, and 12 hours. A schedule the agent created can use another value. The list then also offers that value. The schedule runs from midnight. Run every 6 hours runs at 00:00, 06:00, 12:00, and 18:00.
- Daily shows Time.
- Weekly shows Days of the week and Time. The buttons Weekdays, Weekends, and Every day set the days for you.
- Monthly shows Day of the month and Time. The day list offers 1 to 28.
A line under the fields describes the result, for example Every day at 09:00. Hyground shows the name of the time zone in parentheses after it. A recurring schedule runs in the time zone of your installation, not the one of your computer.
The same line appears in the Schedule column of the table.
What do you write in the Prompt field?
Write in Prompt as you write a message to the agent. The session starts empty, so that message carries the whole task. See Write a good message.
Type / in Prompt to pick a skill. Hyground offers
the matching entries while you type. See Run a skill.
Type @ to pick a cluster or a cluster group. The
list opens only when your installation manages several clusters. It is the same
list the message box offers. See
Address several clusters at once.
Pause and resume a schedule
-
Click the Session Scheduler icon in the left navigation.
-
Click Table in the top right corner.
-
Turn off the switch in the Enabled column. The switch turns light blue.
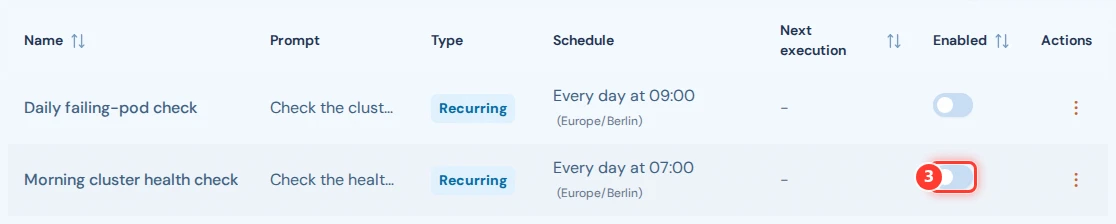
Turn the switch on again to resume the schedule. The switch is orange while the schedule runs.
Next execution counts down to the next session while the schedule runs. It shows a dash while the schedule is off.
In the standard order, a schedule you turn off moves behind every schedule that is on. See In which order does the table list the schedules?.
Only a Recurring schedule has this switch. A One-time schedule has none. Delete a one-time schedule to stop it.
Delete a schedule
-
Click the Session Scheduler icon in the left navigation.
-
Click Table in the top right corner.
-
Click the three dots icon in the Actions column of the row.
-
Click Delete.

-
Click Delete in the Delete schedule dialog.
Hyground shows Schedule deleted. You cannot undo this.
What else is in the row menu?
- Run now starts a session immediately. The planned times stay as they are.
- Edit with Hyground opens a new session. The agent describes the schedule and waits for your instructions.
- Edit manually opens the Edit schedule dialog with the fields of the schedule.
Read the sessions of a schedule
- Click the Session Scheduler icon in the left navigation.
- Click Table in the top right corner.
- Click the row of the schedule. The detail page opens.
- Click a row in the Last sessions table.
The detail page repeats Name, Prompt, and Schedule. It also shows Created, Last modified, and Next execution. Created and Last modified name the user behind each date. The name reads Hyground when the agent created or changed the schedule.
For a Recurring schedule the card also holds the Enabled switch. The buttons Run now, Edit with Hyground, Edit manually, and Delete schedule stand under that card.
Last sessions lists the sessions of this schedule with the time in the Started at column. Click the refresh icon above the table for the newest state.
To see the sessions of every schedule, click Sessions in the Session Scheduler panel. The Sessions from schedules page opens. Use the All schedules list above the table to see one schedule only. See What does the Sessions page show? for the search box and the Date range field.